- April 26, 2024
- Posted by: Samuel R
- Categories: Cloud Services, Snowflake
Introduction
Amazon Simple Notification Service (Amazon SNS) is a fully managed messaging service provided by Amazon Web Services (AWS). It enables you to send messages or notifications to distributed systems or to individuals via a variety of delivery protocols.
Enabling error notification for AWS SNS offers several advantages:
Real-Time Alerts: SNS enables you to receive notifications in real-time, allowing you to respond promptly to errors or issues within your AWS infrastructure.
Flexible Notification Delivery: SNS supports various delivery mechanisms including email, SMS, HTTP/S, Lambda functions, ensuring the notifications to reach you through preferred channels.
Integration with Other AWS Services: SNS integrates seamlessly with other AWS services, such as CloudWatch, Lambda, and S3, allowing you to trigger actions or workflows automatically in response to error notifications.
Cost-Effective: SNS follows a pay-as-you-go pricing model
Snowflake can push error notifications to a AWS SNS when it encounters errors while loading data as well as while executing tasks.
This blog provides instructions for enabling error notifications to the Amazon Simple Notification (SNS) Service. SNS is a publish/ subscribe messaging service.
Enabling error notifications for tasks and pipes using AWS SNS
Error Notification for Tasks using AWS SNS
This topic provides instructions for configuring error notification support for tasks using Amazon Web Services Simple Notification Service (AWS SNS).
Steps to follow:
Step 1: Creating an Amazon SNS Topic
Step 2: Creating the IAM Policy
Step 3: Creating the AWS IAM Role
Step 4: Creating the Notification Integration
Step 5: Granting Snowflake Access to the SNS Topic
Step 6: Enabling error notifications in tasks & pipe.
Step 1: Creating an Amazon SNS Topic
- To Create an SNS topic in your AWS account, Login into AWS, In the search bar Go to SNS (Simple Notification Service)

- On the Topics page, choose Create topic and Click Next Step.

- On the Create topic page, in the Details section:
For Type, choose a topic type (Standard)

- Choose Create topic.

- The topic is created and a page with the created topic name is displayed.
- Copy the topic ARN to the clipboard, for example:

Create a subscription for the Topic:
- In the Search Bar, go to SNS
- In the left-hand navigation pane, Select Subscriptions

- Select Create Subscription button
- From the page displayed, provide the Topic ARN generated for the Topic you have created.
- Select Email as the Protocol.
- In the Endpoint option, provide your Email address that needs to receive notifications from Amazon SNS.

- Then click on Create Subscription button.

- The Subscriber needs to confirm the subscription from the URL received in subscribers mail.
- Once the subscription has been confirmed from the mail, click on Subscriptions from the left-hand navigation menu.
- In the Subscriptions page, you will be able to see the Subscription Status as Confirmed for the Topic you have created.
Step 2: Creating the IAM Policy
Create an AWS Identity and Access Management (IAM) policy that grants permissions to publish to the SNS topic.
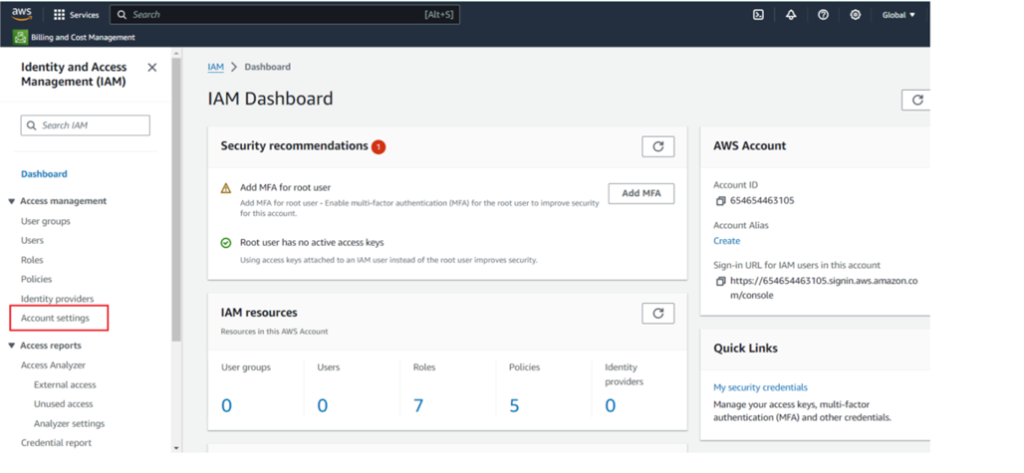
- In the search bar Go to IAM.

- Choose Account settings from the left-hand navigation pane.

- ·In the Security Token Service (STS) section, find the AWS region corresponding to the region where your account is located, and choose Activate if the status is Inactive.

- Choose Policies from the left-hand navigation pane.

- Click Create Policy

- Click on the JSON tab

- · Add a policy document that defines actions that can be taken on your SNS topic.
- · Replace the text in the policy editor with the following text.
{
“Version”: “2012-10-17”,
“Statement”: [
{
“Effect”: “Allow”,
“Action”: [
“sns:Publish”
],
“Resource”: “”
}
]
}
- · Replace sns_topic_arn with the ARN of the SNS topic you created in
- Creating an Amazon SNS Topic.
- · Then Click Next

- Enter the policy name (e.g. Test_topic1) and an optional description. Click Create policy.


Step 3: Creating the AWS IAM Role
- Create an AWS IAM role on which to assign privileges on the SNS topic
- In the search bar Go to IAM.

- Choose Roles from the left-hand navigation pane

- Click the Create role button.

- Select AWS account as the trusted entity type.

- Select the Require external ID option. This option enables you to grant permissions on your Amazon account resources (i.e. SNS) to a third party (i.e. Snowflake).
- For now, enter a dummy ID such as 0000.
- Click the Next button.

- Locate the policy you created in Step 2: Creating the IAM Policy (in this topic), and select this policy.

- Enter a name and description for the role, and click the Create role button.

- Locate the Role you have created now, and click on this role.

- Record the Role ARN value located on the role summary page.

Step 4: Creating the Notification Integration
- Create a notification integration using CREATE NOTIFICATION INTEGRATION. An integration is a Snowflake object that references the SNS topic you created.
- A single notification integration can support multiple tasks and pipes.
- Specify the Topic ARN copied from AWS in the first step in AWS_SNS_TOPIC_ARN property of notification integration.
- Specify the Role ARN copied from AWS in the second step in AWS_SNS_ROLE_ARN property of notification integration.
CREATE OR REPLACE NOTIFICATION INTEGRATION ERROR_INTEGRATION_TASK
ENABLED = TRUE
TYPE = QUEUE
NOTIFICATION_PROVIDER = AWS_SNS
DIRECTION = OUTBOUND
AWS_SNS_TOPIC_ARN = ‘arn:aws:sns:us-east-1::Test_Topic1′ AWS_SNS_ROLE_ARN = ‘arn:aws:iam:::role/Test_topic1′
Step 5: Granting Snowflake Access to the SNS Topic
- Retrieve the IAM User ARN and SNS Topic External ID
Execute DESCRIBE INTEGRATION:

Record the following generated values:
SF_AWS_IAM_USER_ARN
SF_AWS_EXTERNAL_ID
Modify the Trust Relationship in the IAM Role:
- Log into the AWS Management Console.
- From the home dashboard, choose Identity & Access Management (IAM):
- Choose Roles from the left-hand navigation pane.
- Click on the role you created in Step 3: Creating the AWS IAM Role (in this topic)
- Click on the Trust relationships tab.
- Click the Edit trust relationship button.
- Modify the policy document with the DESC NOTIFICATION INTEGRATION output values you recorded previously in this step-5 : SF_AWS_IAM_USER_ARN and SF_AWS_EXTERNAL_ID

Click the Update Trust Policy button. The changes are saved.
Step 6: Enabling error notifications in tasks
You then enable error notification, in either a standalone or root task, by setting ERROR_INTEGRATION to the name of the notification integration. You can set the property when you create a task (using CREATE TASK) or later (using ALTER TASK).
Create tasks using the notification integration object
CREATE OR REPLACE TASK ERROR_NOTIFICATION.NOTIFICATION_SCHEMA_DM.DM_EMPLOYEES_TASK
SCHEDULE = ‘1 MINUTE’
SUSPEND_TASK_AFTER_NUM_FAILURES = 2
ERROR_INTEGRATION = ERROR_INTEGRATION_TASK
AS CALL ERROR_NOTIFICATION.NOTIFICATION_SCHEMA_DM.SP_RAW_TO_DM_EMP_PROC();
- Once the above setup is complete you start receiving notifications on task failures.
Enabling error notifications in pipes
- To enable error notifications for a pipe, specify an ERROR_INTEGRATION parameter value.
- To create a new pipe and specify the error_integration, execute the following command.
CREATE OR REPLACE PIPE
ERROR_NOTIFICATION.NOTIFICATION_SCHEMA_RAW.RAW_EMPLOYEES_TAB_PIPE
AUTO_INGEST = TRUE
ERROR_INTEGRATION = ERROR_INTEGRATION_TASK
AS COPY INTO
ERROR_NOTIFICATION.NOTIFICATION_SCHEMA_RAW.raw_employees_table
FROM
(SELECT A.$1,A.$2,A.$3,A.$4,A.$5,A.$6,A.$7,A.$8,A.$9,A.$10,A.$11
FROM @ERROR_NOTIFICATION.PUBLIC. SNOWFLAKE_EMPLOYEES_STAGE A)
FILE_FORMAT = (FORMAT_NAME = ‘ERROR_NOTIFICATION.NOTIFICATION_SCHEMA_RAW.SNOWFLAKE_FILE_FORMAT’);
To enable error notifications for an existing pipe, you have to use the ALTER TASK command. Modify an existing pipe using ALTER PIPE:
ALTER PIPE <name> SET ERROR_INTEGRATION = <integration_name>;
CONCLUSION:
In this use case, we have seen how to create Amazon SNS Topic and Subscriptions and how to create the Notification Integration in Snowflake referencing the SNS Topic we have created. Then we enabled Error Notification for the created Tasks and pipes in Snowflake to receive the notifications.
Thus, enabling Error Notifications for Tasks and Pipes using AWS SNS making us promptly notified of errors so that we can take proactive measures to resolve issues before they escalate. Moreover, as AWS SNS is a highly scalable and reliable notification service, notifications are delivered consistently even during periods of high load.
Overall, enabling error notifications using AWS SNS in Snowflake enhances the visibility, responsiveness, and reliability of your data platform, contributing to improved operational efficiency and data integrity.
Cittabase is a select partner with Snowflake. Please feel free to contact us regarding your Snowflake solution needs. Our snowflake solutions encompass a suite of services for your data integration and migration needs. We are committed to providing personalized assistance and support customized to your requirements.


