
- November 15, 2023
- Posted by: Sudharchanan Vinayagam
- Category: VBCS
Oracle Visual Builder is a cloud-based low-code development platform and a hosted environment for your application development infrastructure. It provides an open-source standards-based solution to develop, collaborate on, and deploy applications within Oracle Cloud. It allows developers and business users to create web and mobile applications with ease, minimizing the need for extensive coding and technical expertise.
Using REST Services to Capture and Transmit Images from Mobile in Oracle Visual Builder
Creating a RestAPI in ORDS [Oracle APEX]:
To expose your data or logic as a web service, you may want to use RestAPI. To create a RestAPI in Oracle APEX, you can follow the steps in this guide: Create RestAPI in Oracle APEX. It will show you how to define the URL, parameters, and output format of your RestAPI.
Here is a quick demo of the RestAPI creation,
Steps for creating Template:
- Under oic.vbcs.com module , click Create Template on right corner at bottom.
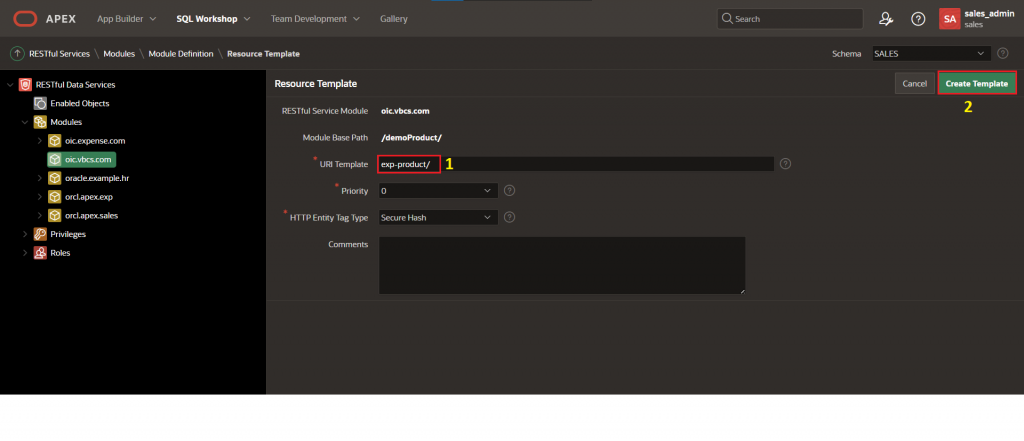
After, you’ll navigate to Template Wizard, now you can specify the URI Template under module base path.
Example:
URI Template: exp-product
Steps for creating Handler [GET]:
- Under oic.vbcs.com/exp-product/ Template, click Create Handler on right corner at bottom.
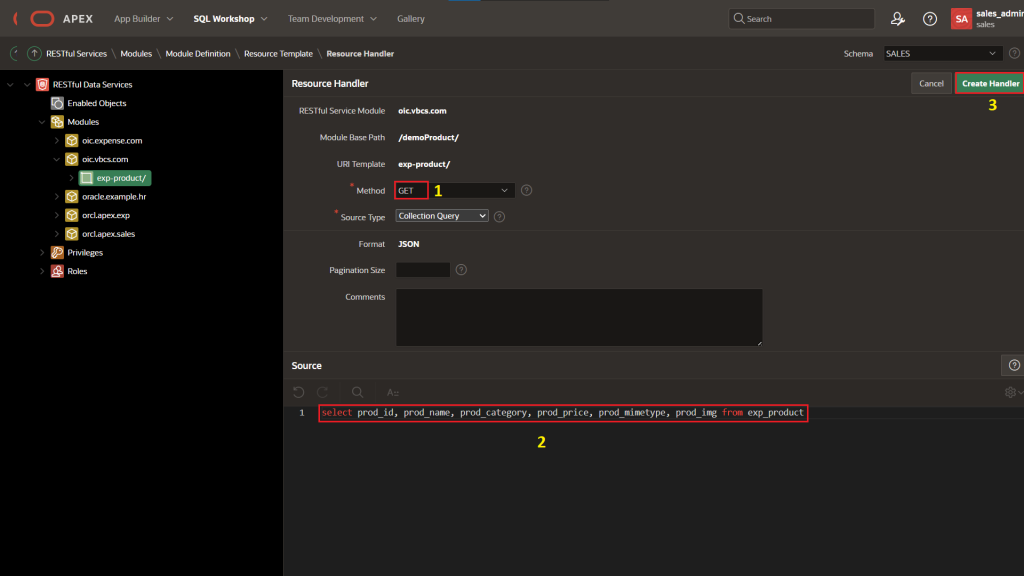
- Select HTTP Get method from the list option given.
- Under you find Source type choose Query.
- In the below you will find the Source to write a SQL query to fetch data from ORDS table to shown in the API call.
Example:
Method: GET
Source Type: Collection Query
Format: JSON
Source: select prod_id, prod_name, prod_category, prod_price, prod_mimetype, prod_img from exp_product;
Using the below link, you can achieve the API Response from oracle visual builder:

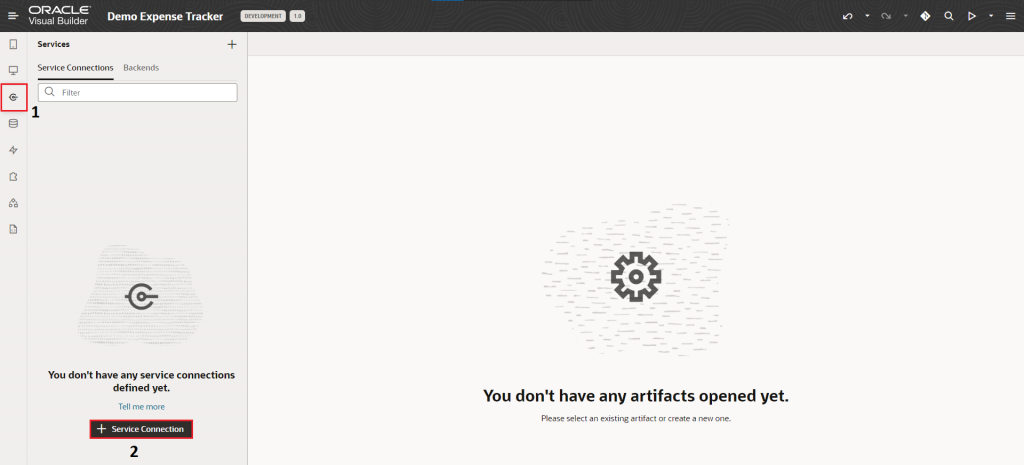
Creating Service Connection:
With GET Method Endpoint:
After creating an oracle visual builder application, From the navigation toolbar, select service connection and then click on the plus icon. This will open a dialog box where you can enter the details of your rest-service connection.
- Create a service connection with GET request call method to fetch data from ORDS table.
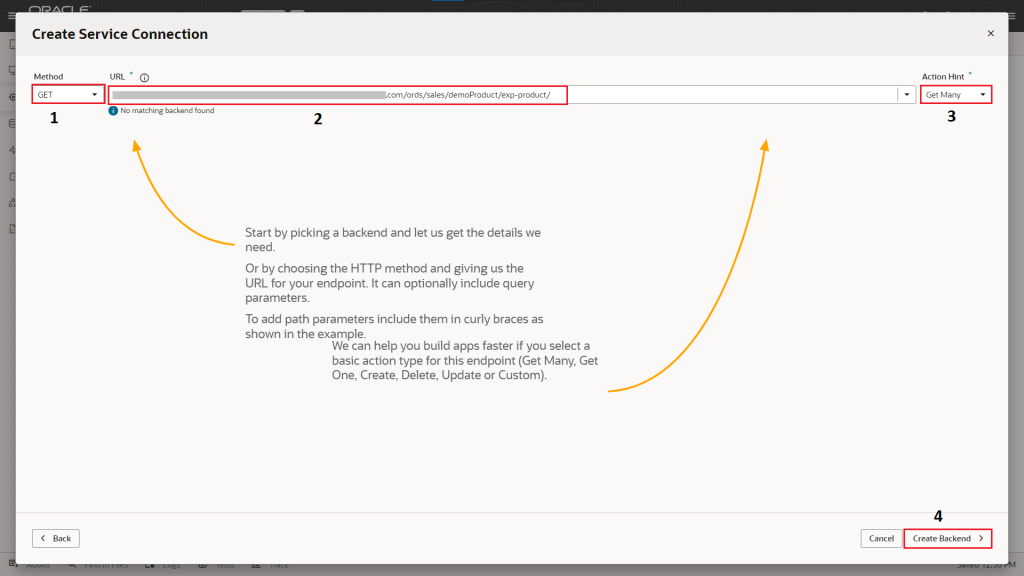
Example:
Method: GET

Action Hint: Get Many
- To retrieve the data from ORDS, you need to choose the GET method and specify the API URL. The GET method allows you to request data from a server without modifying it. The API URL is the address that identifies the resource you want to access.
- Then, you click on Create Backend to create new backend URL for rest-service.

- Next, you will navigate to Backend Specification wizard, it allows you to save and reuse the connection details of a service. You can use it to create multiple resource paths for the same API service. You can also configure the API Authentication in this wizard.
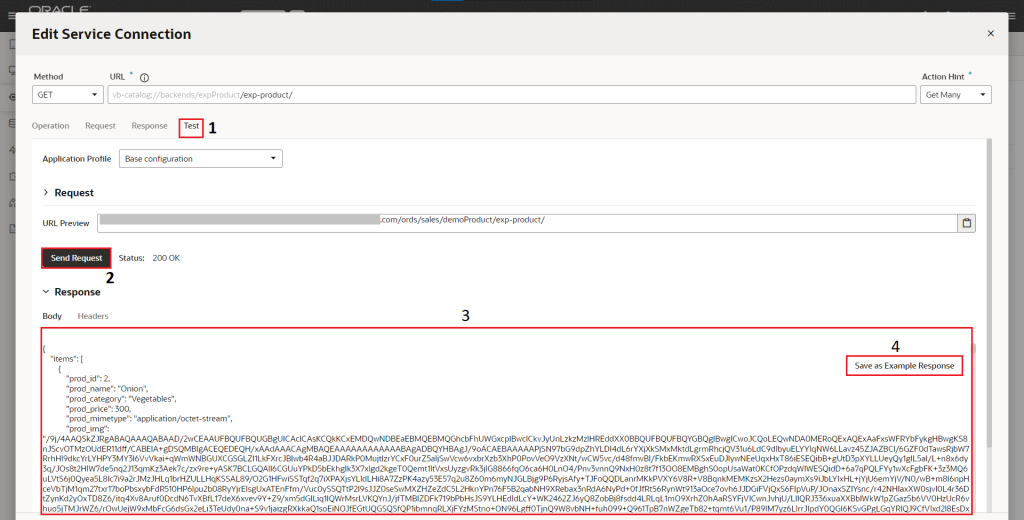
- Under Test section, test the configured GET request and save the response.
Creating Oracle Visual Builder Application to Fetch Data with Image from ORDS:
- Create an oracle visual builder application, then open the Mobile Application wizard
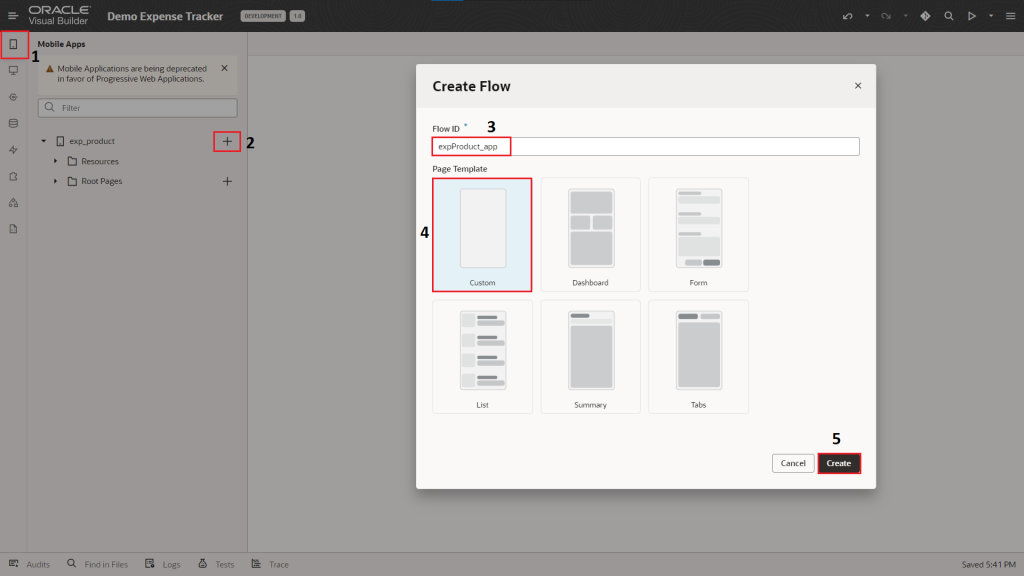
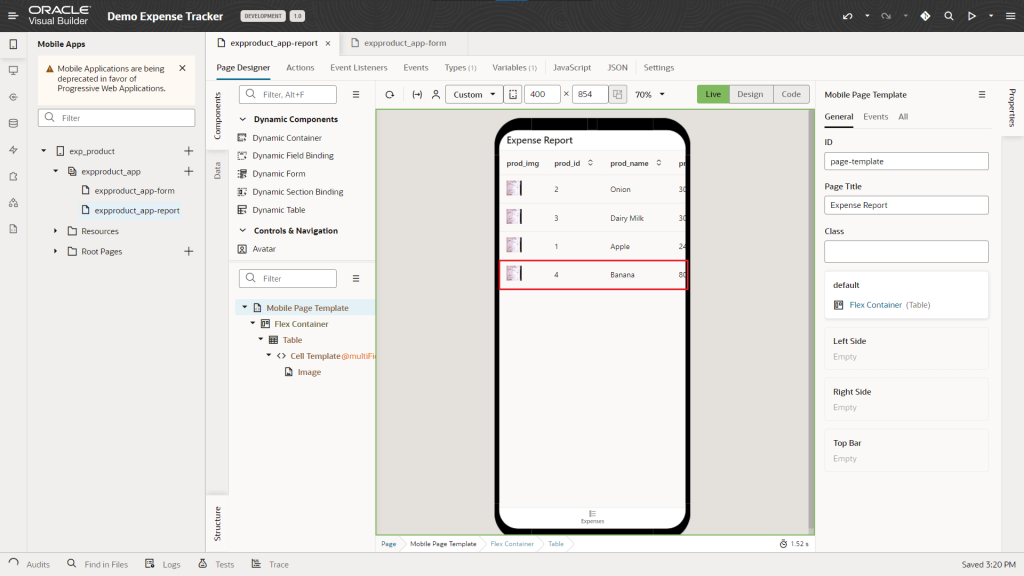
- Next, create a new Flow as expProduct_app with the page as expProduct_app_report as shown below,
- Add a Table component from component pane for creating report with GET request data as shown below,
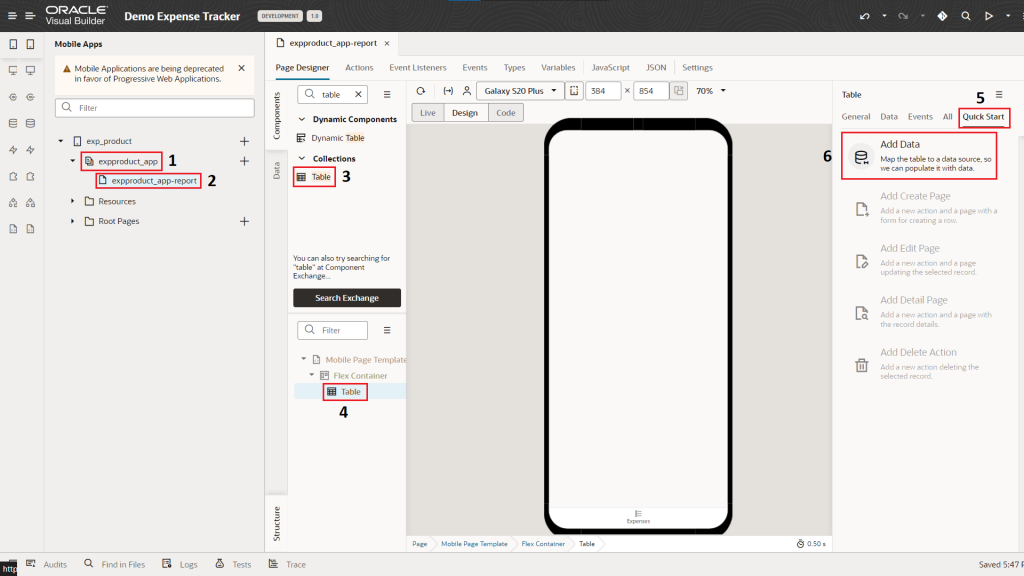
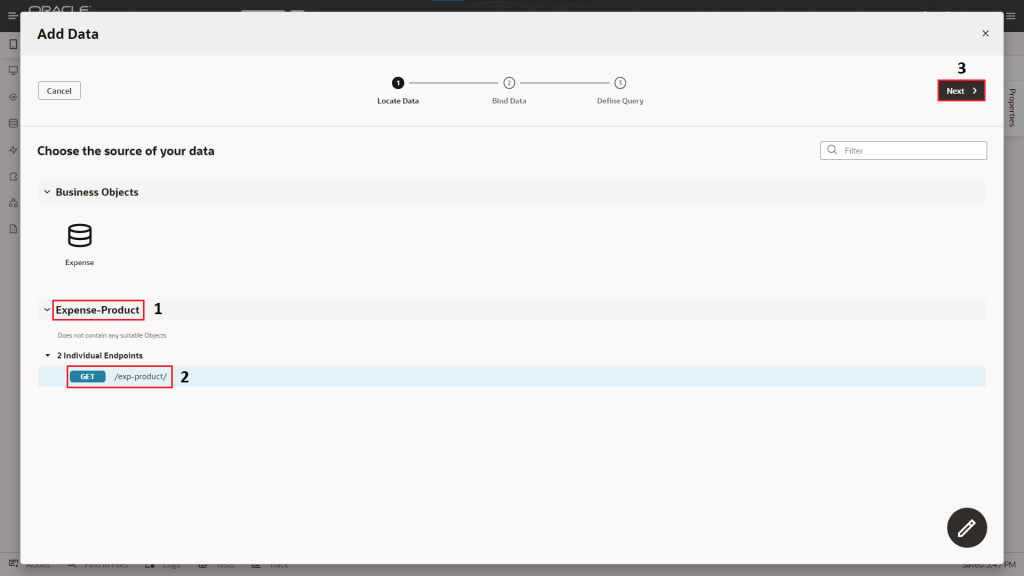
- Click on Add Data from Quick Start in the property pane to call GET rest-service to fetch data to Table component as shown below,
- Next, you can choose your required columns from GET response with define their datatype and page component how the column should be shown in the table.
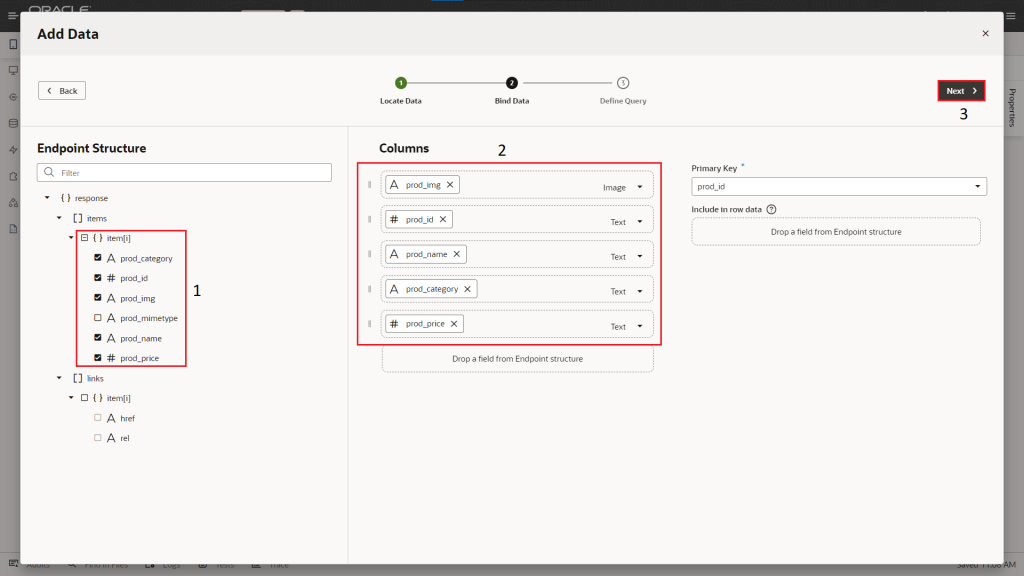
- In oracle visual builder application supports to display an image in the form of image URL or image with their location at local storage, but here an image format was base64 string [as BLOB] so you should do some data format.
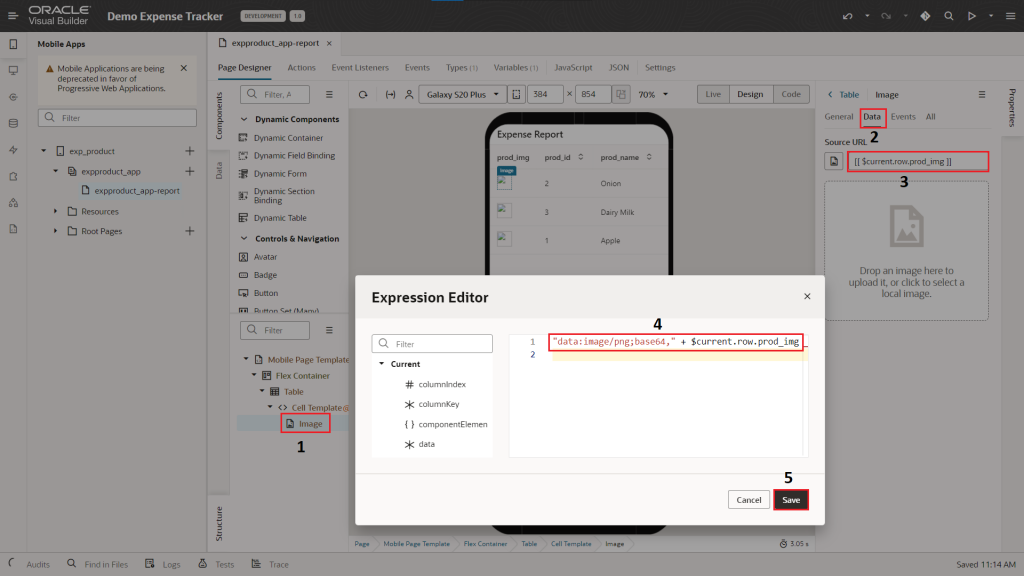
- Click on Image component which represents your prod_img column, then go to Data from the properties pane.
- Next, open Source URL content box to provide a variable which stores prod_img columns data with data format syntax.
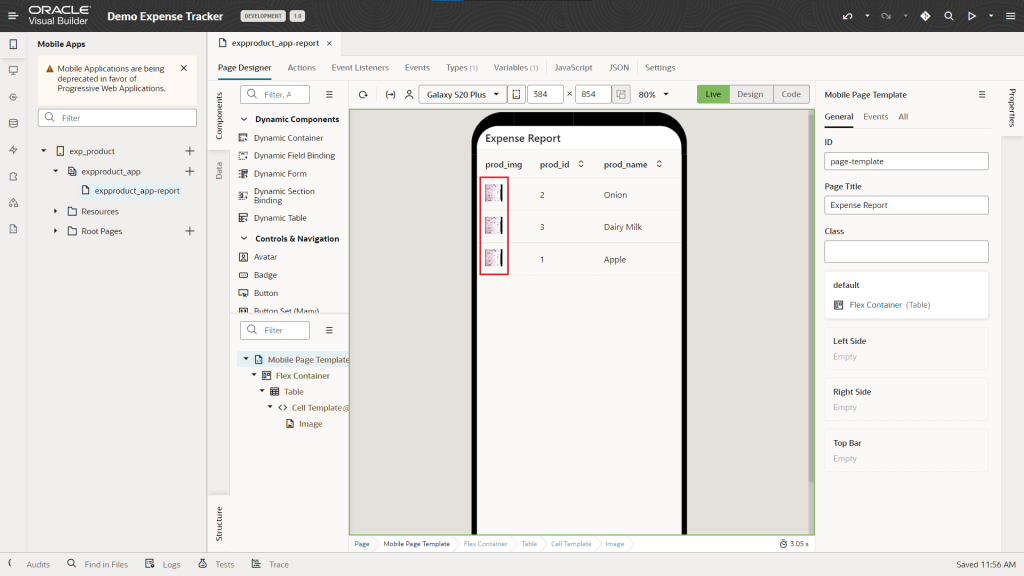
- Now, you created a visual builder report with images payload along with product details through rest-service.
Steps for creating Handler [POST]:
- Under vbcs.com/exp-product/ Template, click Create Handler on right corner at bottom.
- Select HTTP POST method from the list option given.
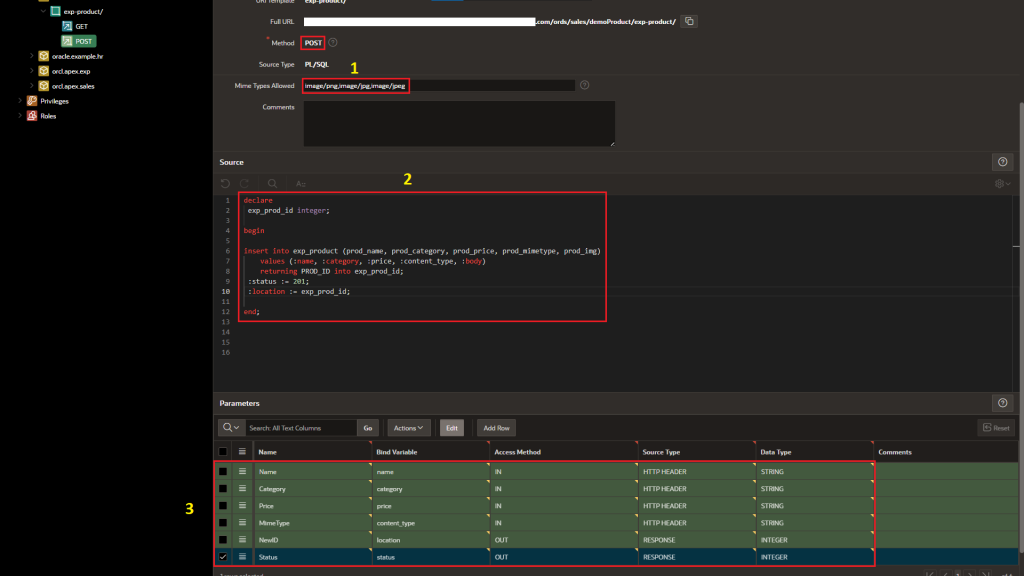
- In Mime Type Allowed, you can specify a media type which you planned to send through rest-service.
- In the below you will find the Source to write a SQL query to fetch data from ORDS table to shown in the API call.
- You should define bind variable which you mentioned in your SQL query in Source to send as a parameter in Rest-Service Request Body.
Example:
Method: POST
Source Type: PL/SQL [static, default]
Mime Type Allowed: image/png,image/jpg,image/jpeg
Source:
declare
exp_prod_id integer;
begin
insert into exp_product (prod_name, prod_category, prod_price, prod_mimetype, prod_img)
values (:name, :category, :price, :content_type, :body)
returning PROD_ID into exp_prod_id;
:status := 201;
:location := exp_prod_id;
end;
Using the below link, you can achieve the API Response from oracle visual builder:
With POST Method Endpoint:
- Click on Expense-Product service-connection, then add new rest-service endpoint as POST on Endpoint section.
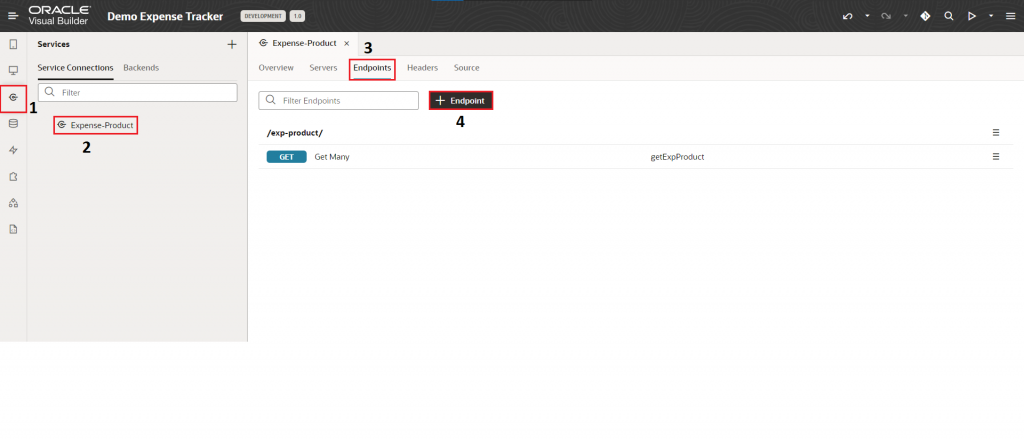
- Below shown figure represents POST request creation details,
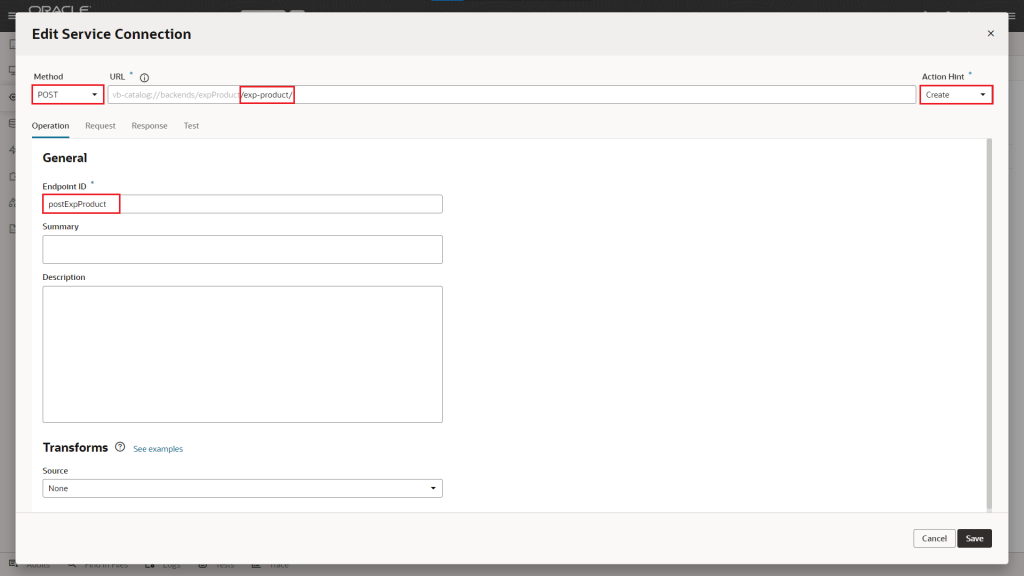
Example:
Method: POST
Action Hint: Create
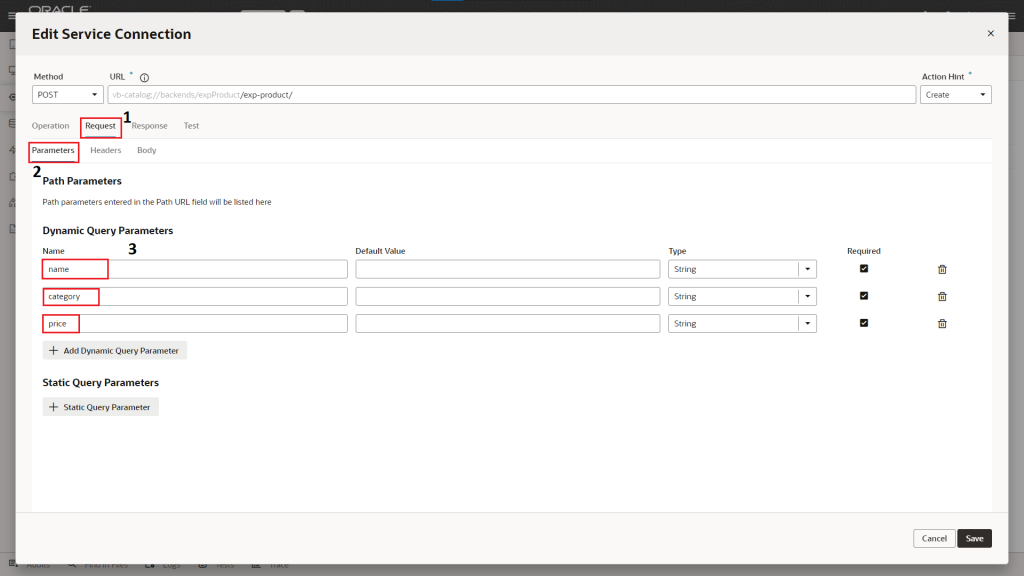
- Under Request tab, click on Parameters to define parameter variable which you created as a Bind variable in ORDS POST rest-service.
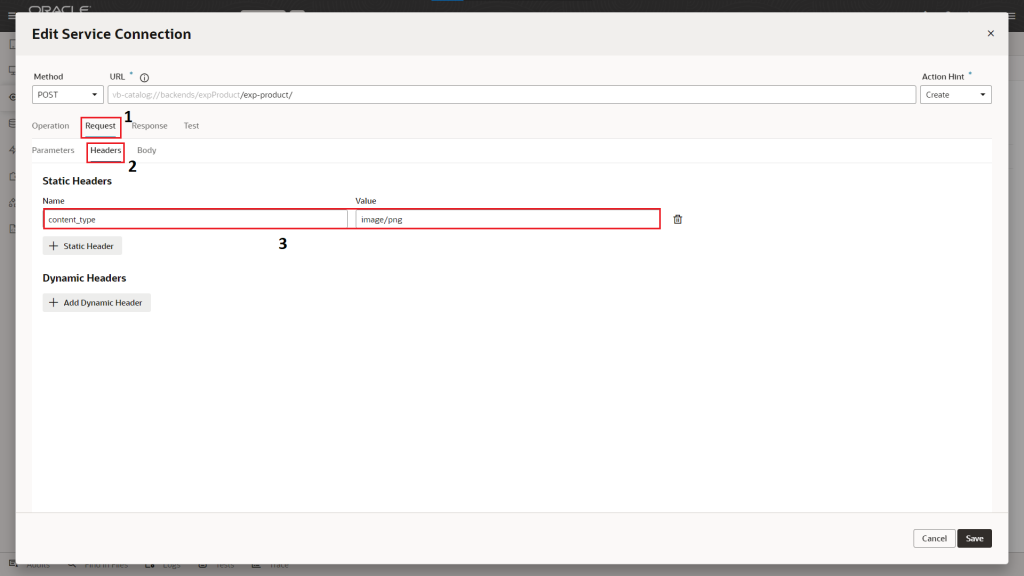
- In Header section of Request tab, you should define sending image files mime type as a content_type
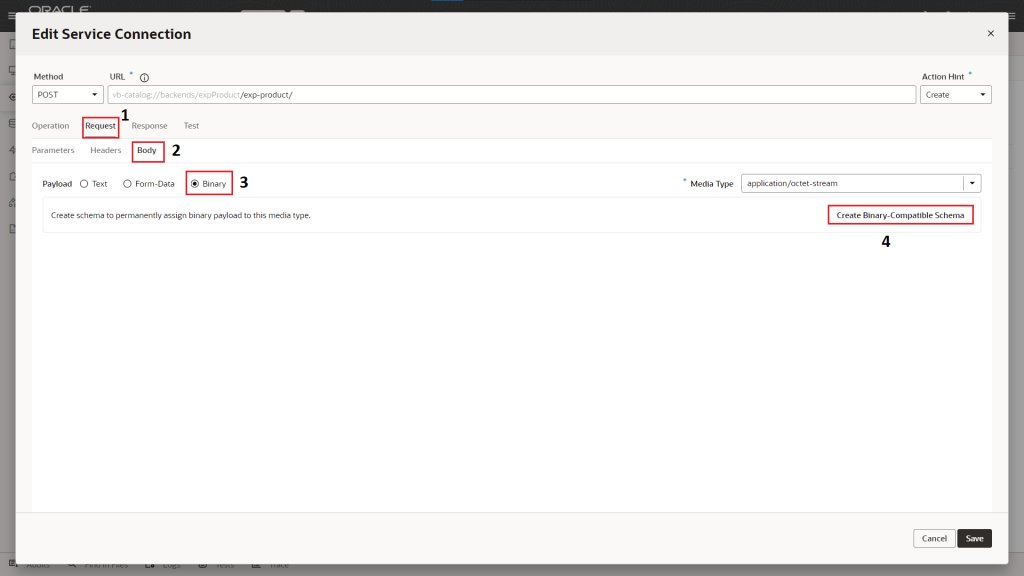
- Create a payload schema that can handle binary data, such as an image file, you need to select the Binary option when you click to create a new schema. This will mark the schema as binary-compatible, meaning that it can accept both text and binary values in the API call.
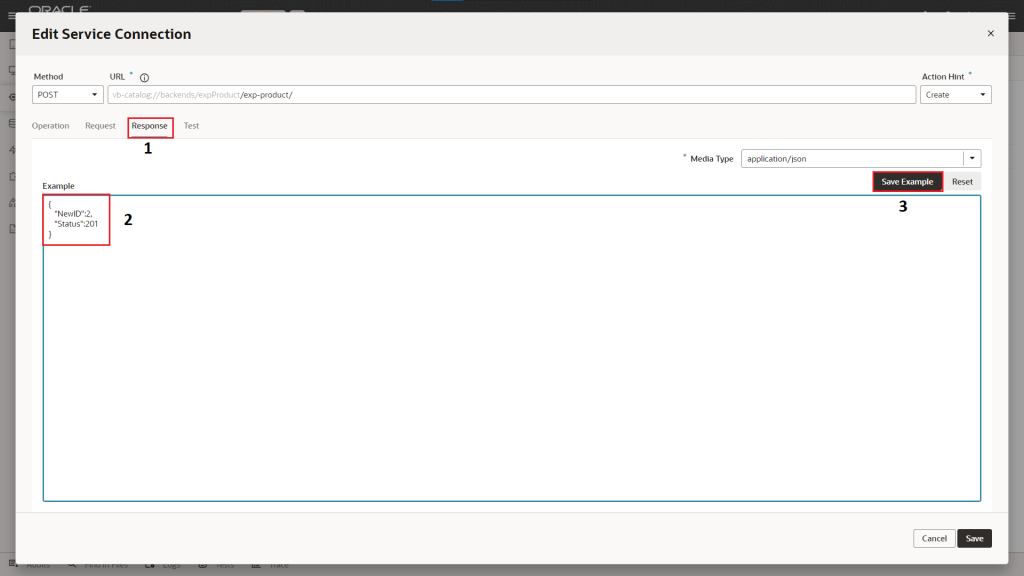
- Click on Response tab to provide custom Json format of response data which you’ll receive after your POST request call completes successfully.
- To provide sample Json format of the response data is shown above figure in the Response tab. You can view the original response data with the sample format of Json when you complete you POST request call successfully. The data contains information such as the status code, created entry’s primary ID.
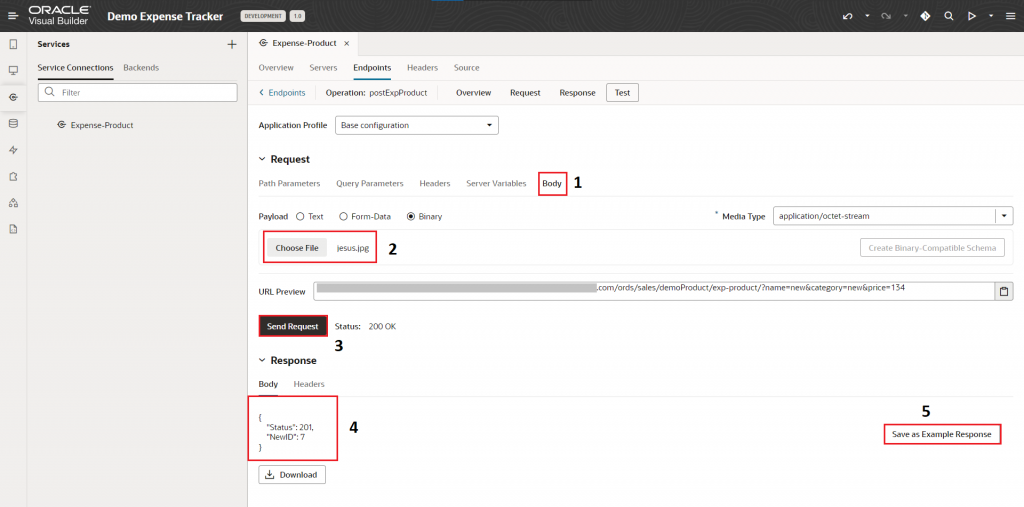
- Under Test section, test the configured POST request with providing data along with uploading image and save the response.
Creating Oracle Visual Builder Application to Insert Data with Image to ORDS:
- Under expProduct_app flow, create a new page as expProduct_app_form as shown below,
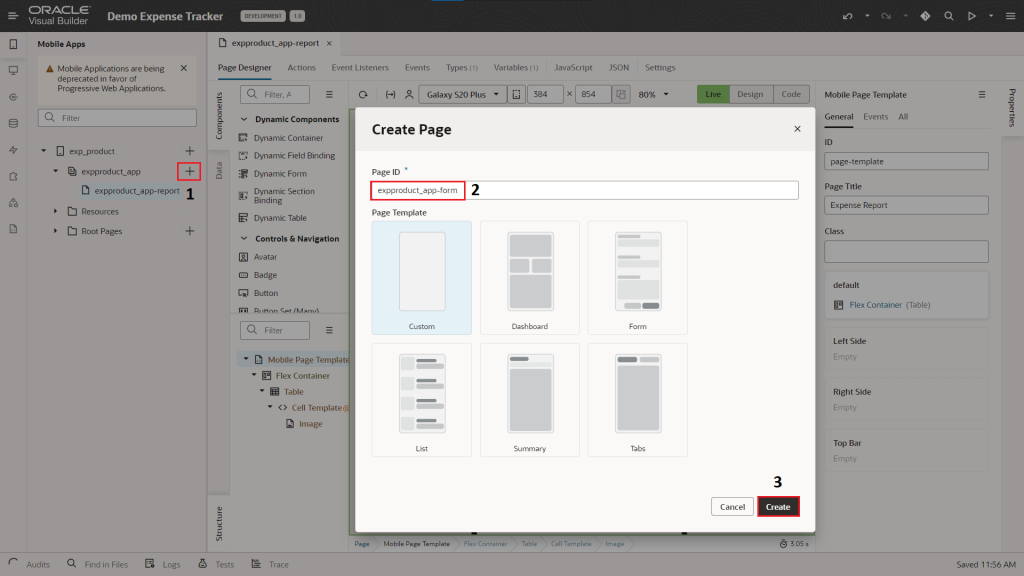
- Add a required page components such as Input text, Buttons, Avatar, File-picker with Button from component pane for creating form with POST request data as shown below,
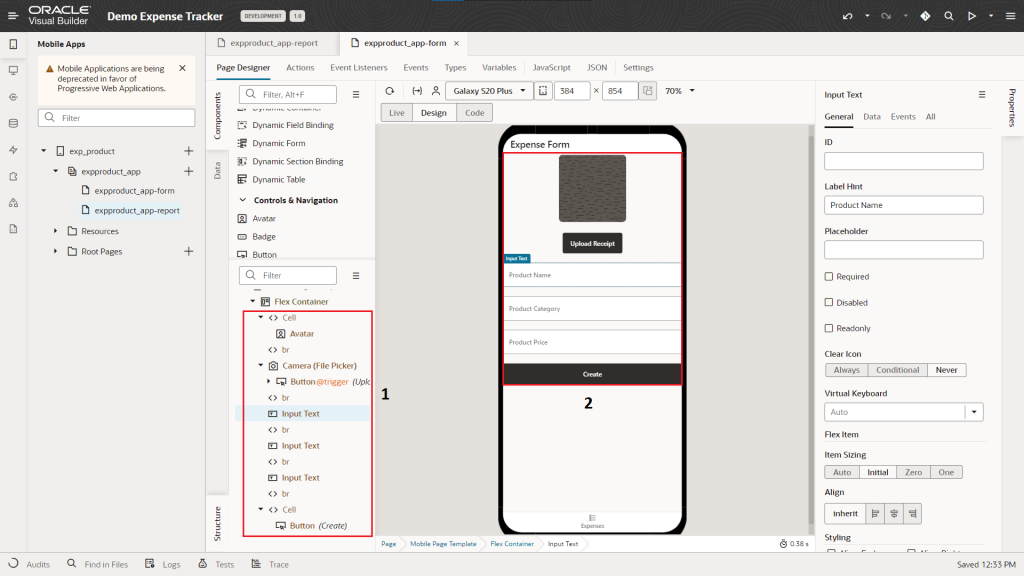
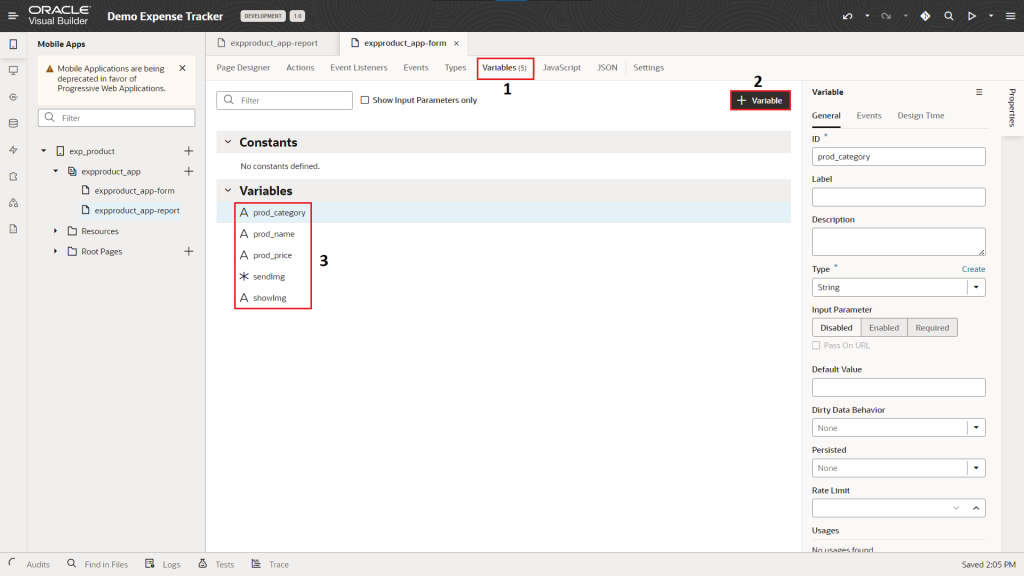
- Click on Variables from toolbar to create page variables for respective page components and define their respective datatypes as shown below,
Example:
prod_name – It holds Product name field data, and their type is String.
prod_category – It holds Product Category field data, and their type is String.
prod_price – It holds Product Price field data, and their type is String.
showImg – It holds image as a URL which shown in application Avatar page component.
sendImg – It holds base64 String value for an image which you upload in application so their datatype should be specified as ANY.
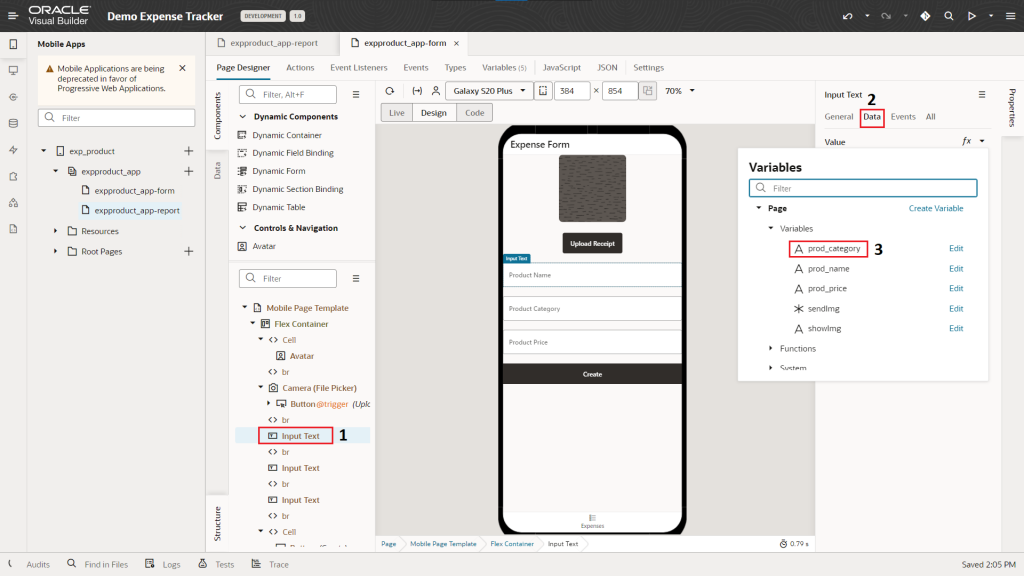
Then, assign the created variables to their respective page components on their Data tab from property pane,
Example:
Avatar – showImg
Product Name – prod_name
Product Category – prod_category
Product Price – prod_price
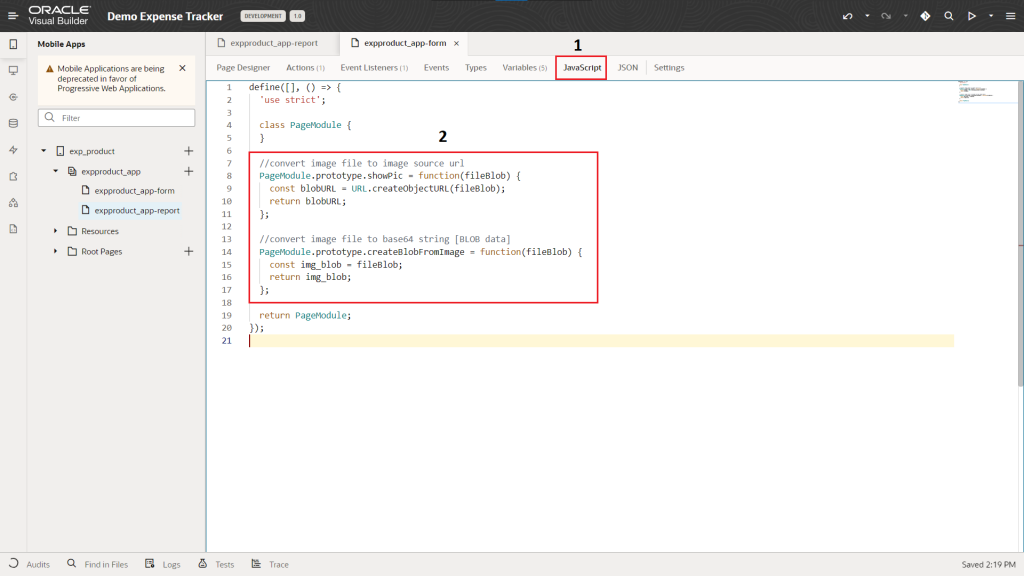
- The following code snippet shows how to define two JavaScript functions for handling image uploads. The showPic function takes an image file as an input and returns a URL that can be used to display the image in the application. The createBlobFromImage function takes an image file as an input and returns a base64 encoded string that can be stored in a BLOB column of an ORDS table.
JavaScript code:
PageModule.prototype.showPic = function(fileBlob) {
const blobURL = URL.createObjectURL(fileBlob);
return blobURL;
};
PageModule.prototype.createBlobFromImage = function(fileBlob) {
const img_blob = fileBlob;
return img_blob;
};
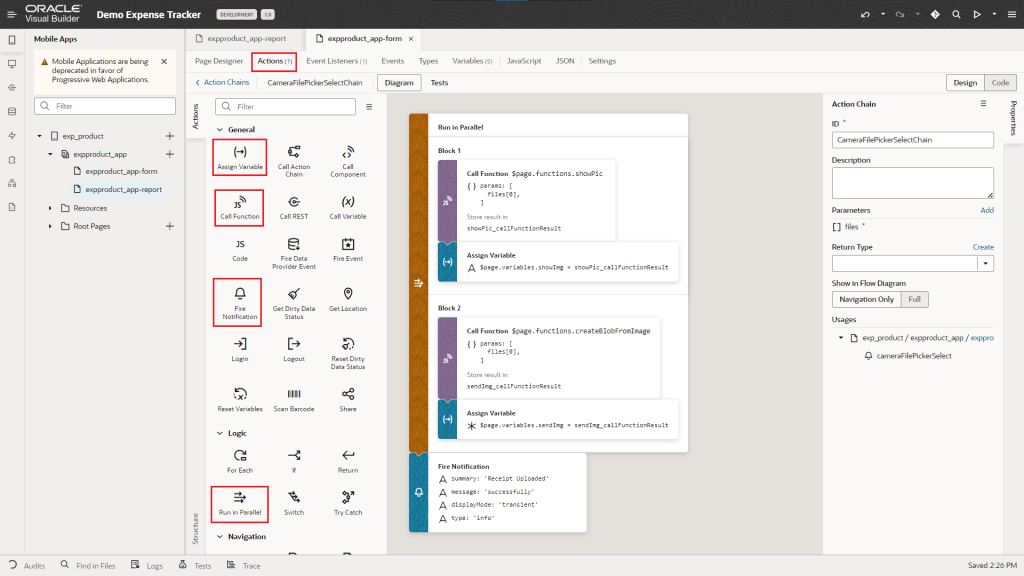
- Then, click on Camera file-picker component, from their property pane choose Event tab to create new event as ‘on Selected Files‘ to navigate on Dynamic action flow design page for uploaded image to be shown on Avatar component and that should be sent through POST rest-service call.
- By use of Run in Parallel component to run more than one dynamic event simultaneously, so after calling the defined JavaScript function, that function returned value will be stored in respective page variables,
- Returned value of showPic will be stored in showImg variable to display the uploaded image.
- Returned value of createBlobFromImage will be stored in sendImg variable to pass the uploaded image on POST request to ORDS BLOB column.
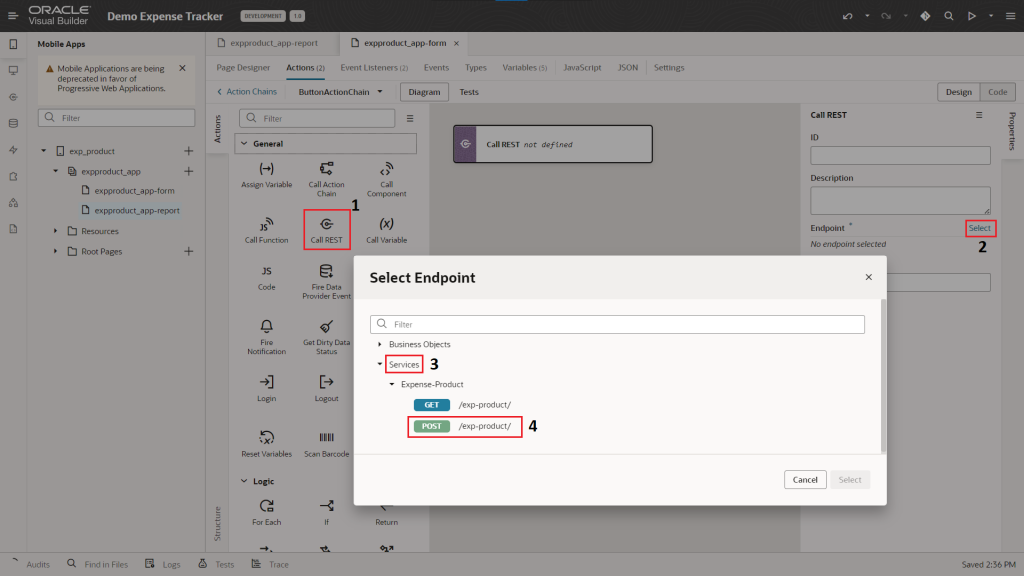
- Next, click on Create button component, in property pane choose Event tab to create new event as ‘on ojAction’ to navigate on Dynamic action flow design page for inserting new data from page to ORDS table by Calling POST rest-service.
- After, drag and drop the Call Rest component, select the POST rest-service endpoint.
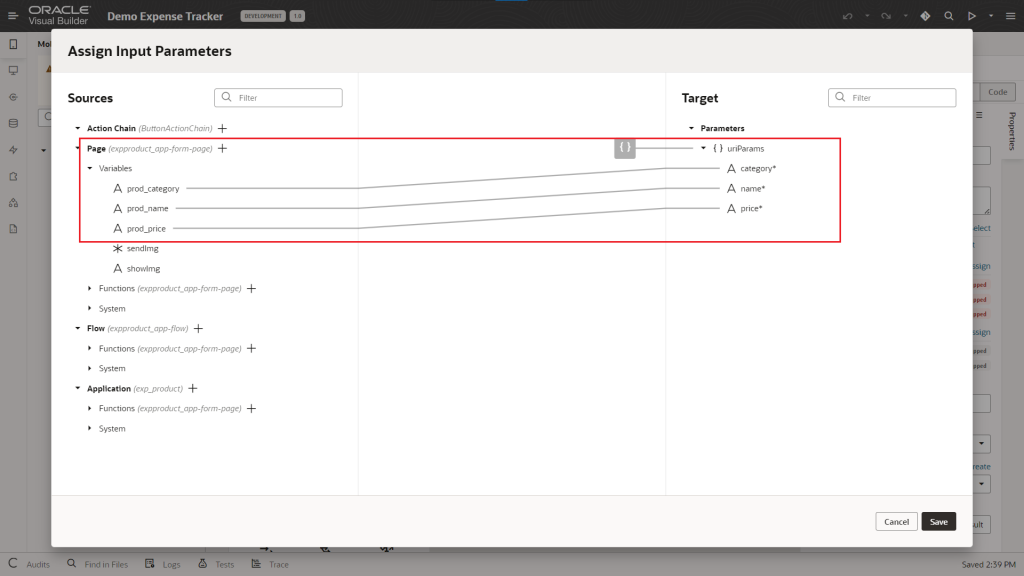
- To insert data into the ORDS table, you need to map the application variable to the rest-service parameter in the property pane of Call Rest. Click on Assign from Input Parameters and select the variable. Then, click on body from Parameters and select the sendImg variable that contains the converted BLOB data.
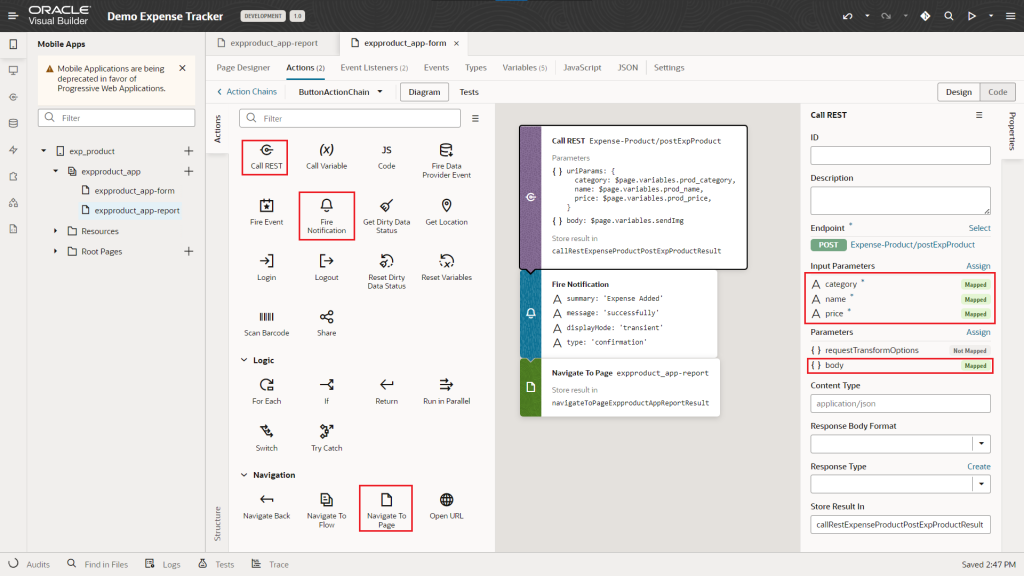
- The final step is to use a Navigate To Page component to redirect the page flow after creating a new expense. This component will take you to the expProduct_app_report page, where you can see the details of your expense report.
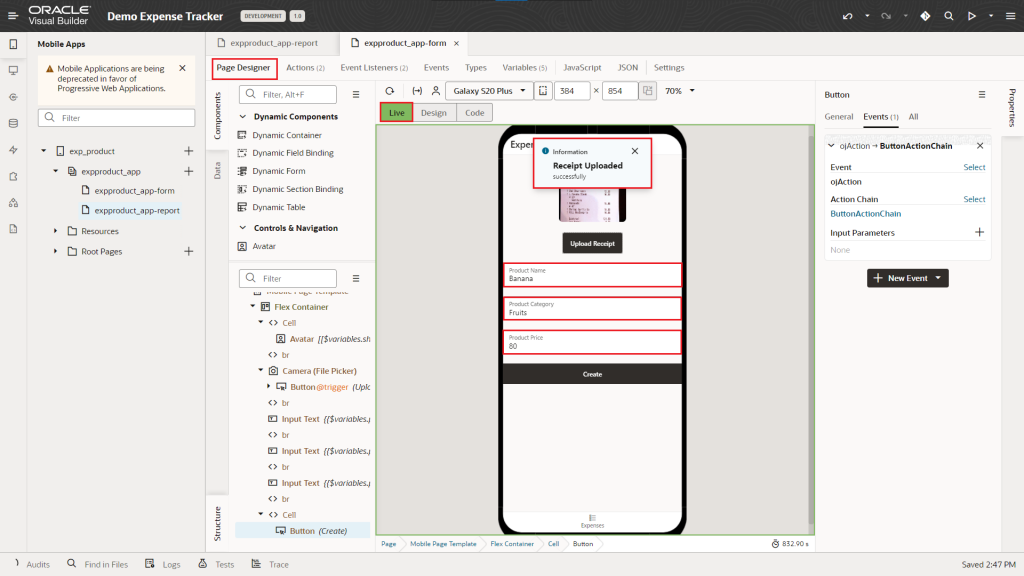
- You will be providing required data to the form page component and then, you can click on the Create button and see the result as shown below,
Please feel free to reach Cittabase for more information. Visit our blogs for more topics on Oracle Visual Builder.