- August 21, 2024
- Posted by: Priyanka P
- Categories:
Apache Spark is an open-source analytics engine powering Databricks’ Unified Analytics Platform, built for big data and machine learning. Designed for speed, simplicity, and versatility, Spark efficiently handles both real-time and batch analytics.
Azure Data Lake Storage (ADLS) is a cloud-based data lake built on Azure Blob storage, designed to store and analyze vast amounts of data in any format and at any speed. Ideal for organizations leveraging big data, ADLS supports the storage and analysis of petabyte-scale files and trillions of objects, debugging and optimizing large-scale data programs, developing massively parallel applications, performing batch, streaming, and interactive analytics, and running data transformation and processing workloads
In this blog, we will guide you through creating a robust data processing pipeline using Apache Spark within the Databricks environment, integrating seamlessly with Azure Data Lake Storage (ADLS). We’ll cover the complete workflow from setting up your Databricks workspace to loading processed data into Azure SQL Database. Follow these steps to ensure a smooth end-to-end process:
- Logging into Databricks and Setting Up Your Environment.
- Connecting to Azure Data Lake Storage (ADLS) using an account key.
- Reading and processing CSV data with custom schemas.
- Handling data transformations and null value replacements.
- Writing processed data back to DBFS and loading it into Azure SQL Database.
Let’s dive into each step with detailed explanations and code snippets.
1. Logging into Databricks and Setting Up Your Environment
Here’s a detailed guide on how to log into Databricks and set up your environment:
-
Accessing Databricks:
- Log in to Azure Portal: Start by logging into your Azure portal at portal.azure.com.
- Navigate to Databricks: In the Azure portal, search for “Databricks” in the search bar at the top and select the Azure Databricks service from the search results. If you don’t see it, you may need to add it by creating a new Databricks resource.
- Access Your Databricks Workspace: Select your existing Databricks workspace from the list. If you don’t have one, you’ll need to create a new workspace.
-
Creating a Databricks Workspace:
- Create a New Workspace: If you don’t already have a Databricks workspace, click on “Create” to set up a new workspace. You will need to provide details such as the workspace name, subscription, resource group, and region.
- Follow Setup Guide: Complete the setup process by following the Azure Databricks setup guide, which will walk you through configuring your workspace. Once created, you can access your workspace directly from the Azure portal.
-
Setting Up an All-Purpose Cluster:
- Open Databricks Workspace: Navigate to your Databricks workspace by selecting it from the Azure portal. This will open the Databricks UI in a new browser tab.
- Create a Cluster: In the Databricks UI, go to the “Clusters” tab on the sidebar and click on “Create Cluster.”
- Configure Cluster:
- Cluster Name: Provide a meaningful name for your cluster.
- Cluster Mode: Choose “Standard” or “High Concurrency” depending on your needs.
- Databricks Runtime Version: Select the appropriate runtime version, which includes Apache Spark and other libraries.
- Cluster Size: Configure the number of worker nodes and their types based on your data processing requirements.
- Attach Cluster to Notebook: Once your cluster is created, you’ll need to attach it to your notebook. Open your notebook, go to the top right corner, and select your cluster from the “Cluster” dropdown menu to attach it.
By completing these steps, you will have successfully set up your Databricks environment, including creating a workspace and configuring a cluster. You’re now ready to proceed with connecting to Azure Data Lake Storage (ADLS) and executing your data processing tasks.
2. Connecting to Azure Data Lake Storage (ADLS)
To read data from ADLS, you must configure Spark to use the appropriate account key. This key allows Spark to authenticate and access data stored in ADLS.

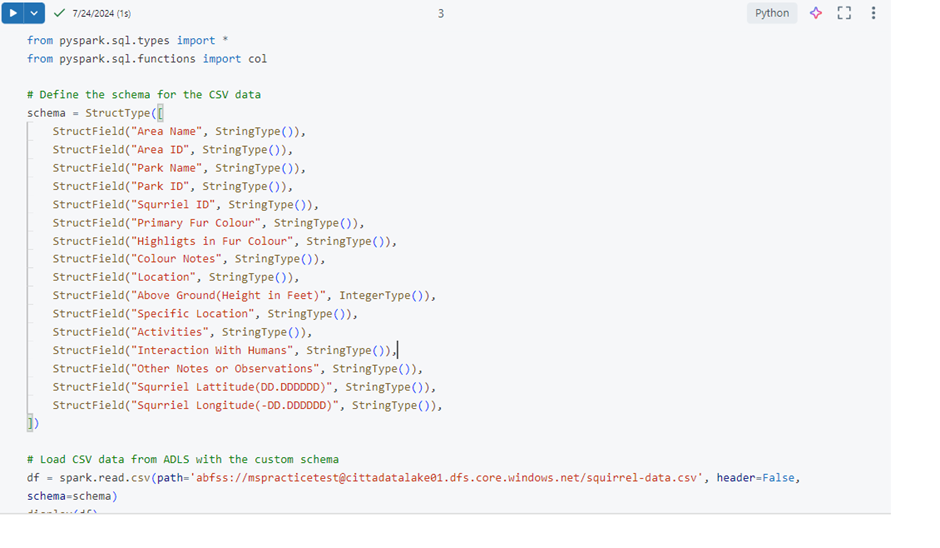
3. Defining and Applying a Custom Schema
When dealing with CSV files, it’s essential to define a schema that matches the data structure. This schema helps Spark interpret the data correctly.
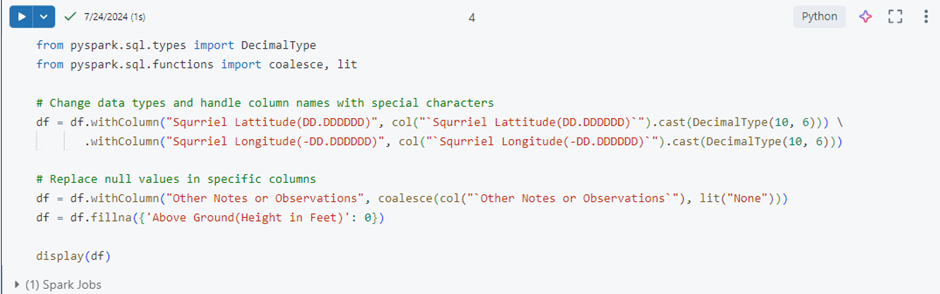
4. Data Transformations
Transformations are crucial for preparing data for analysis or loading into a database. We will change column data types, handle null values, and replace missing data.
5. Writing Processed Data to DBFS
After processing the data, we write it back to DBFS. This makes it accessible for further operations or loading into a database.

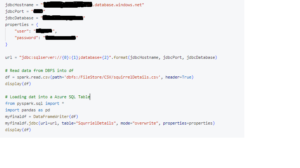
6. Loading Data to SQL Server
The final step involves loading the processed data to Azure SQL Server database. We configure the JDBC connection parameters and use the DataFrameWriter to write the DataFrame to a specified table in the SQL Server database.
Conclusions
In this blog, we have demonstrated how to:
- Logging into Databricks and Setting Up Your Environment
- Connect to Azure Data Lake Storage (ADLS) using an account key.
- Define and apply a custom schema to CSV data.
- Transform data by changing data types and handling null values.
- Write processed data to DBFS.
- Load data into Azure SQL Database using JDBC.
These steps form a comprehensive data processing pipeline that integrates Azure Data Lake Storage with Azure SQL Database using Apache Spark. This workflow can be adapted to various data processing needs and is a robust foundation for building more complex data pipelines.
Please contact us for your Databricks solution requirements. Our solutions include a comprehensive range of services tailored to address your data integration and migration requirements.