
- May 21, 2024
- Posted by: Reshma M
- Category: Snowflake
Introduction:
In this blog, we will explore how to implement a CI/CD process using schema changes in GitHub. Git is crucial for version control and collaborative development, while Snowflake offers powerful cloud-based data warehousing solutions. This guide will focus primarily on automated release management for Snowflake by leveraging the GitHub Actions service from GitHub. Additionally, in order to manage the database objects/changes in Snowflake we will use the schema change Database Change Management (DCM) tool.
Prerequisites:
- Basic understanding of Git version control.
- Access to snowflake account with appropriate privileges.
GitHub Actions:
GitHub Actions makes it easy to automate all your software workflows, now with world-class CI/CD. Build, test, and deploy your code right from GitHub. Make code reviews, branch management, and issue triaging work the way you want.
Schema Change:
Schema change is a lightweight Python-based tool to manage all your Snowflake objects. When schema change is combined with a version control tool and a CI/CD tool, database changes can be approved and deployed through a pipeline using modern software delivery practices.
Change Script Type:
There are three script type available. They are,
- Versioned Scripts: Versioned scripts are change files that allow for incremental changes in a database. The key concept is that each versioned script has a unique version number, and only scripts with a higher version number than the last deployed version are executed during deployment.
Script Pattern: versionnumber__description.sql
- Repeatis Scripts: Repeatable scripts are applied, if there is a change in the file. It runs after all the versioned script run. Examples include stored procedures, functions, and view definitions.
Script pattern: R__description.sql
- Always Scripts: Always change scripts are executed with every run of the schema change process. Always scripts are executed every time, ensuring that specific changes are consistently applied.
Script pattern: A__description.sql
Use Case: Using Single workflow deploying scripts under multiple environments.
Steps to follow to create CICD process:
- Create a new repository in the GitHub account by click + icon.
When using schema change for managing database schema changes across multiple environments (e.g., development, test, production), you can follow below folder structure.
Folder Structure:
Organize your schema change scripts in a directory structure under the project root folder. For example:
(project_root)
|– folder_1
| |– V1.1.1__first_change.sql
| |– V1.1.2__second_change.sql
| |– R__sp_add_sales.sql
| |– R__fn_get_timezone.sql
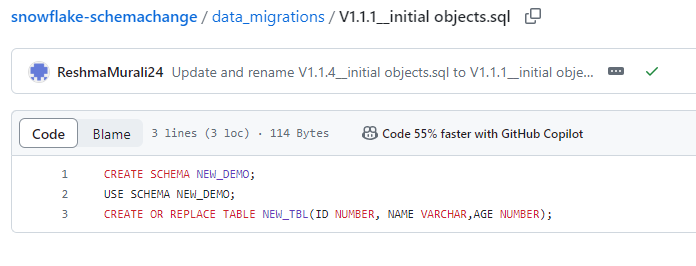
- Under the new repository named Snowflake-schemachange .create a folder named data_migrations. Under the new folder create a SQL script named V1.1.1__initial_objects.sql.
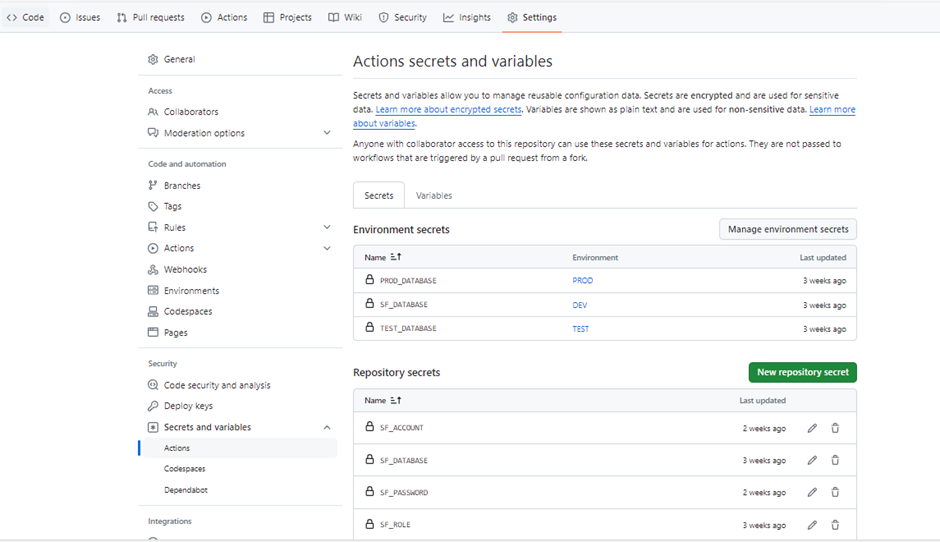
- Create Action secrets. Action Secrets in GitHub are used to securely store values/variables which will be used in your CI/CD pipelines. In this step we will create secrets for each of the parameters used by schema change. Navigate to the settings tab in the top. Select secrets and variable and click new Repository variables.
| Secret name | Secret value |
| SF_ACCOUNT | ob55592.ap-south-1.aws |
| SF_USERNAME | RESHMA |
| SF_PASSWORD | ********** |
| SF_ROLE | ACCOUNTADMIN |
| SF_WAREHOUSE | COMPUTE_WH |
- Create Different environment secrets with different sf_database in each.
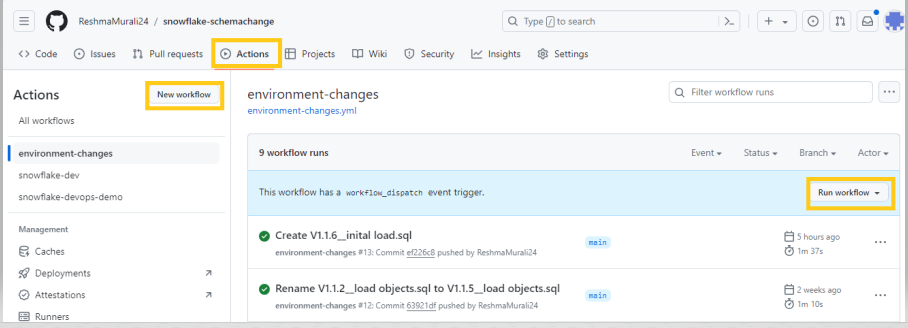
- Create action workflow. Action Workflows represent automated pipelines, which includes both build and release pipelines. They are defined as YAML files and stored in your repository in a directory called .github/workflows. In this step we will create a deployment workflow which will run schema change and deploy changes to our Snowflake database.
Under Actions tab, select new workflow and click set up workflow yourself. Change the yml filename as environment-changes.yml and place the below code under the yml file.
# Controls when the action will run.
on:
  push:
    branches:
      - main
    paths:
      - 'data_migrations/**'

  # Allows you to run this workflow manually from the Actions tab
  workflow_dispatch:

jobs:
  dev:
    runs-on: ubuntu-latest
    environment: DEV
    steps:
      - name: Checkout code
        uses: actions/checkout@v2
        with:
          python-version: 3.8.x

      - name: Run schemachange
        env:
          SF_ACCOUNT: ${{ secrets.SF_ACCOUNT }}
          SF_USERNAME: ${{ secrets.SF_USERNAME }}
          SF_ROLE: ${{ secrets.SF_ROLE }}
          SF_WAREHOUSE: ${{ secrets.SF_WAREHOUSE }}
          SF_DATABASE:  ${{ secrets.SF_DATABASE }}
          SNOWFLAKE_PASSWORD: ${{ secrets.SF_PASSWORD }}
        run: |
          echo "GITHUB_WORKSPACE: $GITHUB_WORKSPACE"
          python --version
          echo "Step 1: Installing schemachange"
          pip install schemachange

          echo "Step 2: Running schemachange"
          schemachange -f $GITHUB_WORKSPACE/data_migrations -a $SF_ACCOUNT -u $SF_USERNAME -r $SF_ROLE -w $SF_WAREHOUSE -d $SF_DATABASE -c $SF_DATABASE.SCHEMACHANGE.CHANGE_HISTORY --create-change-history-table
  test:
    runs-on: ubuntu-latest
    environment: TEST
    needs: dev
    steps:
      - name: Checkout code
        uses: actions/checkout@v2
        with:
          python-version: 3.8.x

      - name: Run schemachange
        env:
          SF_ACCOUNT: ${{ secrets.SF_ACCOUNT }}
          SF_USERNAME: ${{ secrets.SF_USERNAME }}
          SF_ROLE: ${{ secrets.SF_ROLE }}
          SF_WAREHOUSE: ${{ secrets.SF_WAREHOUSE }}
          SF_DATABASE:  ${{ secrets.TEST_DATABASE }}
          SNOWFLAKE_PASSWORD: ${{ secrets.SF_PASSWORD }}
        run: |
          echo "GITHUB_WORKSPACE: $GITHUB_WORKSPACE"
          python --version
          echo "Step 1: Installing schemachange"
          pip install schemachange

          echo "Step 2: Running schemachange"
          schemachange -f $GITHUB_WORKSPACE/data_migrations -a $SF_ACCOUNT -u $SF_USERNAME -r $SF_ROLE -w $SF_WAREHOUSE -d $SF_DATABASE -c $SF_DATABASE.SCHEMACHANGE.CHANGE_HISTORY --create-change-history-table
  prod:
    runs-on: ubuntu-latest
    environment: PROD
    needs: test
    steps:
      - name: Checkout code
        uses: actions/checkout@v2
        with:
          python-version: 3.8.x

      - name: Run schemachange
        env:
          SF_ACCOUNT: ${{ secrets.SF_ACCOUNT }}
          SF_USERNAME: ${{ secrets.SF_USERNAME }}
          SF_ROLE: ${{ secrets.SF_ROLE }}
          SF_WAREHOUSE: ${{ secrets.SF_WAREHOUSE }}
          SF_DATABASE:  ${{ secrets.PROD_DATABASE }}
          SNOWFLAKE_PASSWORD: ${{ secrets.SF_PASSWORD }}
        run: |
          echo "GITHUB_WORKSPACE: $GITHUB_WORKSPACE"
          python --version
          echo "Step 1: Installing schemachange"
          pip install schemachange


          echo "Step 2: Running schemachange"
          schemachange -f $GITHUB_WORKSPACE/data_migrations -a $SF_ACCOUNT -u $SF_USERNAME -r $SF_ROLE -w $SF_WAREHOUSE -d $SF_DATABASE -c $SF_DATABASE.SCHEMACHANGE. CHANGE_HISTORY --create-change-history-table
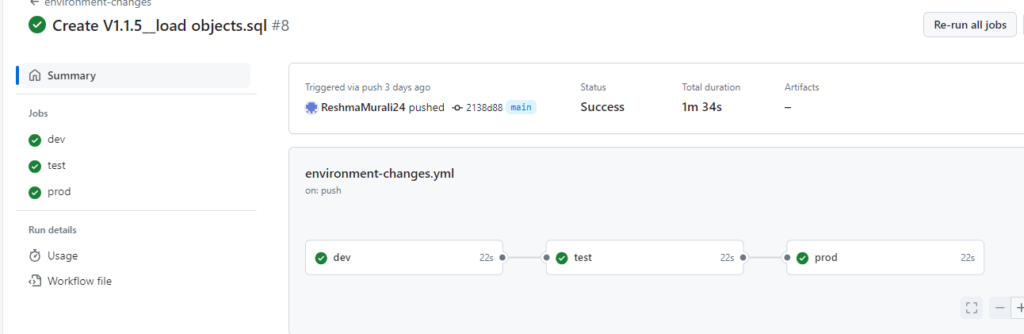
- Under Actions tab, run the created workflow manually. The output of the script run is given below.
- After completion of workflow successfully. Confirm the objects are deployed in the snowflake account under three environments.
Conclusion:
Hence, by following the steps outlined in this guide, you can seamlessly synchronize code and data between Snowflake and your Git repository using CI/CD process.
Cittabase is a select partner with Snowflake. Please feel free to contact us regarding your Snowflake solution needs. Our snowflake solutions encompass a suite of services for your data integration and migration needs. We are committed to providing personalized assistance and support customized to your requirements.